Microsoft LCDS 2.6

Microsoft released a new version of its Learning Content Development System.

These are the new features:

  • compatibility wit Internet Explorer 9
  • enhanced keyboard accessibility for all Silverlight interactive elements
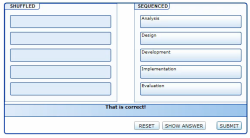
  • new sequencing activity topic template – where you have to put elements in the correct order
  • new card flip game topic template

Click the image below for an screencast of the new sequencing activity.

You can download the new version on https://www.microsoft.com/en-us/learning/lcds-tool.aspx.

When you open an existing course, it is automatically upgraded to the new version.

Microsoft LCDS version 2.5

Microsoft released a new version of its Learning Content Development System, the free content authoring tool. The release notes show the following changes:
  • E-learning created is compatible with Firefox 3.5.9 and Firefox 3.6.3.
  • Microsoft Silverlight 4 Media Player for animations that include closed captioning.
  • Enhanced keyboard accessibility for the sort and tile games, adventure interactivity, and Voice of the Expert element.
  • LCDS authoring and e-learning created are completely compatible with Microsoft Silverlight 4.0.
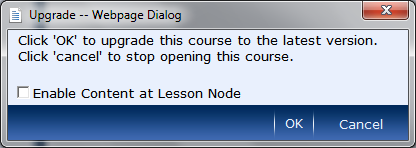
An interesting new feature is the possibility to create content on the “lesson” level. Previous versions did not allow this, which sometimes resulted in blank pages in the course structure when you imported the SCORM package in an LMS. When you open a course in the new version, you will notice an option to enable the content at the lesson level:
Tip: if you don’t know which version of LCDS you are running, open LCDS and press Shift+F1.

Tips and best practices for screencasts

The people from TechSmith (Camtasia, Jing, Snagit…) recently polled their community for best practices and tips for creating effective screencasts, software animations, screen demo’s, whatever you want to call them.
They bundled the result in a 3-page booklet, in a kind of “tag cloud” format. Quick to read, and very valuable!

You can download it from their blog.

Interface language in Adobe Presenter projects

In one of our recent projects, we used Adobe Presenter to create some course material and quizzes based on PowerPoint slides. This actually works very well, but one thing bothered me: the “interface” of the course or quiz is sometimes shown in a different language. We are talking about these texts:

presenter1

presenter2

I was wondering how you could “force” it to be in one language, and what was the logic behind it. This is what I found out:

  • the language you get in the interface is based on the Regional Settings of the pc you display the content on. So NOT on the language settings of your browser (which seems more logical to me). This is an issue in Belgium as we have French (Belgium) and Dutch (Belgium), and not every computer is configured correctly.
  • the text is only modified if your regional settings are set to one of these languages: German, French, Korean, Japanese, Portuguese, Spanish, Italian, Simplified Chinese, or Dutch. In all other cases, English is shown.
  • you can customize this text by creating a custom theme with the Theme Editor for your project. Consult the Adobe Presenter help pages for the correct procedure.

And this last topic gives you a possible solution for a “fixed” language: if you set the labels for all languages to the same language, you have your uni-lingual interface. That’s a lot of copy-pasting, but it works!

Adding a new language to Microsoft LCDS

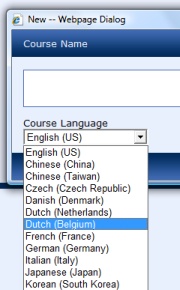
Someone asked me if it would be possible to add a new language to the available language packs of the Microsoft Learning Content Development System. Well, as the system supports already multiple languages, that should not be that difficult. This is what I did (use at your own risk!):

  • Navigate to C:\Program Files\Microsoft\Learning\LCDSc\application\viewer. This folder contains a subfolder, one for every available language.
  • Copy the folder that corresponds most to the language you want to create. Or if no correspondence, copy any folder and give it a three letter language code.
  • Inside your new folder, go to the folder named shared. Inside that folder, there is a folder with the same language code, rename that to your new code.
  • Inside that folder, there is a file version.xml. Edit the file in Notepad and make the necessary changes.
  • Open the viewer folder inside that folder.
  • The file viewerstrings.js contains the different language strings for the viewer. Edit the file in Notepad and translate.
  • The Help and appart folder contain the help screens. Translate these if necessary.
  • Go back to C:\Program Files\Microsoft\Learning\LCDSc\application and edit the supportedLanguages.xml file with notepad. Copy one of the lines to add a new line for your language.

Done! The new language should appear when creating a new course!