The ribbon in SharePoint 2010 – tutorial

I have been getting a lot of questions about tutorials on how to use the ribbon in SharePoint 2010. Of course, creating a “general” tutorial about this is not so obvious, because the ribbon is context-sensitive, and what you need to know about it, actually depends on the functionalities you use in SharePoint. But I think the movie below (by Lynda.com) gives you a good overview.

Users who are familiar with SharePoint 2007 and are looking for a familiar command in the ribbon, can download the SharePoint Server Ribbon Reference on the Microsoft Office website. This is an Excel spreadsheet that lists the new locations of SharePoint commands in the 2010 version.

Teaching in the future with Microsoft Interactive Classroom

Sometimes you discover a great learning tool, hidden somewhere on the web. The Microsoft Interactive Classroom is such a tool, and it gives us a taste of what classroom training might be in the (near) future. If you have ever wondered if they was way you could avoid printing tons of paper manuals, if you are tired of distributing PowerPoint handouts that nobody ever uses, this is for you.

Basically, it is an add-on to PowerPoint and OneNote (2007 or 2010). As a teacher, you use PowerPoint to prepare your slides as usual, and you can use the Microsoft Interactive Classroom add-on to add question slides in your presentation. You get an extra tab in the ribbon for that:

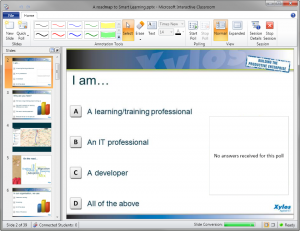
Once you start giving your session, you click the Start Session button. This starts a broadcast of your presentation on the network. Your screen will look like this:

With the ribbon, you can annotate your slides (works great if you have a tablet!) but also start polls, display the results of the poll to your students…

But the best feature is yet to come. Your students connect to your broadcasted session with… OneNote! They automatically get a copy of the slides as a separate note page, they can take their own notes on the slides, they see the annotations of the instructor in their OneNote… and after the session they go home with their own annotated lesson material. Of course, they need to be connected to the same network (wired or wireless).

We tried it during an interactive session of one hour with 20 workstations and it was quite impressive. And what is even better: it’s free!

Update: this tool is now officially part of Microsoft OneNote and called OneNote Class Notebookhttps://www.onenote.com/classnotebook

Why did Yanina not fill in her whereabouts?

tennisbal

I was watching the interview of tennis player Yanina Wickmayer where she explains why she did not fill in her whereabouts in the ADAMS computer system. As a result, she got suspended for one year.

I do not want to take any position about this decision (there are enough Facebook groups that do that), but this story reveals some typical problems that need to be addressed when introducing a new software tool:

  • Communicate clearly: the “business rules” need to be communicated clearly, so that the user knows the policy and guidelines. For that, you use the proper way of communication with your users (oral, e-mail, …) Sending letters to the home address of a globetrotter does not fall under “proper way of communication”.
  • Motivate: if your users know the philosophy of your application, why it makes things easier and what the benefits are, chances are much higher that the tool will be accepted.
  • Make it look nice:while applications are judged by IT people on their functionalities, the end users have a lot of interest for the “look & feel” of the application. If it looks good, your application will “sell better”.
  • Leverage technology: a web application is a good choice for a global, world wide application, but “a pc connection to the internet” does not seem to be always available to the sporters. But I’m sure they all have a Blackberry. Why not make a mobile app?
  • Train and document: the ADAMS application is a great example where the use of e-learning would be very appropriate: lot’s of users, spread over the entire world. Short demos, faqs, procedures…

WADA, Vlaamse Overheid, if you need any help, let me know. I see it as my contribution to Belgian top tennis.

Tips and best practices for screencasts

The people from TechSmith (Camtasia, Jing, Snagit…) recently polled their community for best practices and tips for creating effective screencasts, software animations, screen demo’s, whatever you want to call them.
They bundled the result in a 3-page booklet, in a kind of “tag cloud” format. Quick to read, and very valuable!

You can download it from their blog.

My Top Learning Tools

Jane Hart keeps a list of Top Learning Tools, submitted by learning professionals from all over the world. This is my top list:

1. SharePoint: has become my platform of choice for knowledge sharing. The My Site stores all my content, shared or not shared, and makes it accessible from anywhere.

2. OneNote: because of its integration with other Microsoft Office products, I prefer OneNote over other note taking tools like Evernote.

3. Captivate: has been my favorite screencasting tool since version 1.0, because of its ease of use and flexible outputs.

4. Camtasia: my alternative for Captivate when it comes to recording complex applications that need real-time recording.

5. Jing: an ideal screencast recorder for “quickies”

6. WordPress: a versatile weblog with a great community around it

7. Delicious: has replaced my favorites and is quickly becoming my personal web memory

8. Google Reader: allows you to follow hundreds of RSS feeds, share posts, rate them…

9. TweetDeck: Twitter is great if you want to follow the “buzz” of the moment, but it would be impossible to manage the stream without an application like TweetDeck.

10. Adobe Presenter: one of the easiest PowerPoint converters with video, quizzing and SCORM support.